Archive | Breads RSS feed for this section

Ham and Cheese Sliders

12 Dec

IMG_3646_1

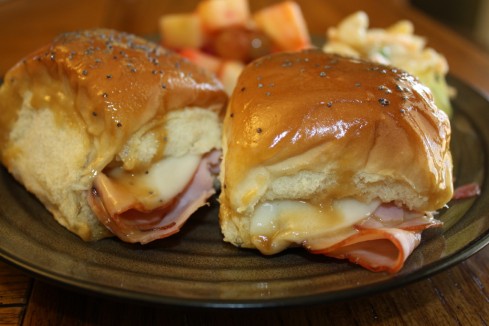
This is a great little sandwich for parties and family get-togethers.  They can be served as an appetizer (because they are small) or as a meal.  Not too long ago, I was responsible for preparing the Wednesday night meal at our church.  I served these with potato salad and baked beans and received several requests to share this recipe, so here it is.  I made these for the family last weekend when we had our annual Christmas tree trimming party, so I took the time to make pictures to share the recipe here.  These are super easy but oh so delicious!

Ingredients:

2 pkg. Hawaiian dinner rolls

thinly sliced deli ham (about 1/2 lb.)

sliced Provolone cheese

4 Tablespoons butter

1 1/2 teaspoons Dijon mustard

1 Tablespoon brown sugar

1 1/2 teaspoons Worcestershire sauce

1/2 teaspoon poppy seeds

Directions:

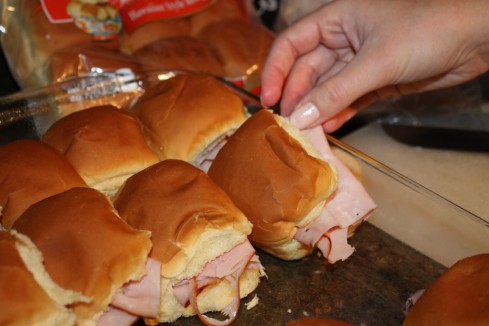
Preheat oven to 350 degrees.  Slice the Hawaiian rolls in half, and place a piece of ham and piece of cheese in center of each.

IMG_3635_1_1

Place sandwiches close together in a glass baking dish that has been sprayed with cooking spray.

IMG_3634_1_1

Melt butter in a glass measuring cup in the microwave.  Add the mustard, brown sugar, and Worcestershire sauce.  Stir to combine.

IMG_3638_1

Drizzle the butter mixture over the top of the sandwiches, then spread out evenly with the back of a spoon.

IMG_3642_1

Sprinkle with poppy seeds.

IMG_3644_1

Place in the preheated oven and bake until the cheese has melted and the sandwiches are heated all the way through, 10-15 minutes.

IMG_3645_1

Serve.

IMG_3646_1

Leah’s Crumb Cake

22 May

IMG_2398_1

This is not your everyday, run-of-the-mill coffee cake.  This coffee cake (and it is excellent with a cup of coffee!) is a cut above.  It has a wonderful texture because it’s made with cake flour instead of regular flour.  And the crumb topping is not your typical streusel, it’s something much more!  Part of the process in making this is taking the time to shape the topping into little balls of deliciousness!  It’s worth the effort and only adds a few minutes to the total time.  Leah has made this crumb cake several times, and she knows I love it!  It’s probably the recipe I request most often when she wants to bake and is asking for suggestions.  And I’m always ready to eat it once she gets it baked!

Ingredients:

Crumb Topping-

1/3 cup sugar

1/3 cup dark brown sugar

3/4 teaspoon ground cinnamon

1/8 teaspoon salt

1 stick butter, melted and still warm

1 3/4 cups cake flour (comes in a box and can be found in the baking aisle with the other flours. Do not substitute regular flour)

Cake –

1 1/4 cups cake flour (do not substitute)

1/2 cup sugar

1/4 teaspoon baking soda

1/4 teaspoon salt

6 Tablespoons butter, cut into little cubes.  Need to be softened but still cool

1 egg plus 1 egg yolk

1 teaspoon vanilla

1/3 cup buttermilk

confectioner’s sugar for dusting

Directions-

For the topping- Stir together the sugars, cinnamon, salt, and melted butter together.

IMG_2346_1

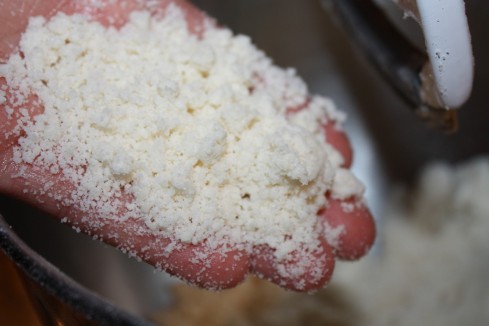
Add flour and stir until the dough  is completely combined.  It will appear lumpy.

IMG_2347_1

IMG_2348_1

Set aside to cool to room temperature while you make the coffee cake dough.

For the cake-  Preheat oven to 325 degrees.  Cut a 16 inch piece of parchment or foil.  Spray an 8 inch square pan with cooking spray and fit parchment or foil into the pan.  Push it down into the corners to fit, and leave excess extended up the sides.

IMG_2388_1

In a mixing bowl, combine the flour, sugar, baking soda, and salt.  Mix on low to combine.  With mixer still running, add butter, a few pieces at a time and continue to beat until mixture is well combined and butter is incorporated.

IMG_2379_1

Butter should be fully incorporated and mixture should resemble coarse crumbs.  It will probably take about 2 minutes of mixing.

IMG_2382_1

Add egg, yolk, vanilla, and buttermilk and beat on medium-high speed until light and fluffy (about 1 minute), scraping bowl if necessary.

IMG_2383_1

Transfer batter to prepared pan and spread evenly.

IMG_2390_1

Break apart  and shape the crumb topping into large pea-sized pieces and sprinkle over the dough.

IMG_2353_1

IMG_2392_1

Coffee cake should be completely covered.  It may seem like too much but trust me, this is the best part!!

IMG_2393_1

Bake at 325 degrees until crumb topping is golden and cake tests done in center.  It will need to bake about 35-40 minutes.

IMG_2394_1

Remove from pan by lifting parchment, then slide off of parchment onto serving plate.

IMG_2396_1

Sprinkle with powdered sugar before serving if desired.

IMG_2404_1

Cinnamon Sugar Biscuits

27 Feb

When my kids were little, I would sometimes make a batch of these cinnamon sugar biscuits for a bedtime snack.  I’m not sure why we started eating these in the evening, because they would make a great breakfast, but somehow they became a bedtime treat.

They are quick to mix together and are really great with a hot cup of coffee!

IMG_2102_1Ingredients:

2 cups self-rising flour

1/4 cup sugar

1 teaspoon cinnamon

1/4 teaspoon baking soda

1/3 cup shortening

1/2 raisins (optional, I left them out since my kids don’t care for them)

3/4 to 1 cup buttermilk

Frosting:

3/4 cups powdered sugar

2-3 teaspoons milk

Directions:

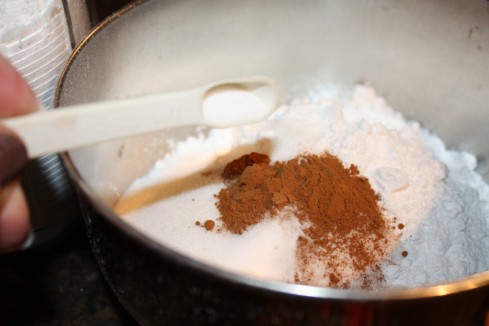
Preheat oven to 450 degrees.  Place flour, sugar, cinnamon, and baking soda into a mixing bowl.

IMG_2075_1_1

Stir the flour and sugar mixture then add the shortening.

IMG_2078_1_1

Using a pastry blender (or a fork), cut in the shortening until the mixture resembles course crumbs. Add just enough buttermilk as you stir to cause the mixture to cling together into a ball.

IMG_2081_1_1

IMG_2083_1_1

Turn out onto a floured surface and pat out to a 1/2 inch thickness.

IMG_2084_1_1

IMG_2085_1

Cut out with a round biscuit cutter and place on a lightly greased baking sheet.

IMG_2086_1

Bake in 450 degree oven for 10 minutes or so until lightly browned.

IMG_2093_1

Cool for about 5 minutes, while you mix the icing.

Place the powdered sugar in a small bowl and add the milk a teaspoon at a time as you stir, until it is a good consistency to drizzle.

IMG_2094_1

Drizzle icing over warm biscuits and serve immediately.

IMG_2096_1

Little Sugar Biscuits

8 Feb

IMG_1835_1

How can such a simple list of ingredients be so good?  These little sugar biscuits are absolutely addictive!  I had originally planned to make these ahead and have them ready for Superbowl, but it definitely did not work out that way!  Once they cooled and I dipped them in the glaze, I told the kids they could each try just one.  One turned into the whole plate before all was said and done (and I was just as guilty as they were).  So simple, so delicious! They would be the perfect addition to a bridal tea or wedding shower, they’d be good for breakfast or as an after school snack, or just to have on hand to eat any time of the year!

Ingredients:

3 cups all-purpose flour

2/3 cup sugar

5 teaspoons baking powder

1/4 teaspoon salt

2 sticks butter (not margarine) cold and cut into pieces

1 1/4 cups heavy cream (plus a little more if needed)

5 cups powdered sugar

1/2 cup milk

1 teaspoon vanilla

dash of salt

Directions:

Preheat oven to 350 degrees.  Mix flour, sugar, baking powder, and salt together in a medium bowl.

IMG_1778_1

IMG_1780_1

Add the cold butter which has been cut into pieces.IMG_1782_1

Using a pastry blender (or a fork), cut the butter into the flour until it is well incorporated and the mixture looks like coarse crumb, like the picture below.

IMG_1784_1

Pour in the heavy cream, stirring gently until moisture is evenly distributed throughout and mixture begins to form into a ball.IMG_1786_1

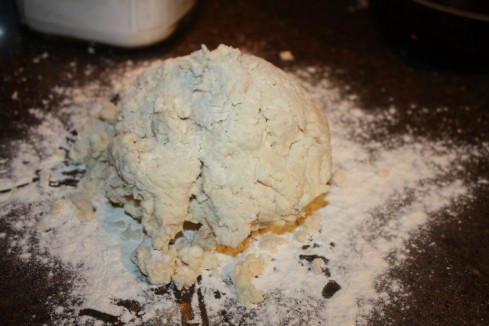
You will probably need to gather it up with your hand at this point, and press it together into a ball.  You may add additional cream if needed so it’s not too crumbly and will hold together into a ball.IMG_1787_1
IMG_1788_1

Place it out on a floured surface and sprinkle a little flour on the top.

IMG_1789_1

Flatten it out a little with your hand, just enough to get a nice mostly circular shape.
IMG_1791_1 Gently roll out with a rolling pin until the biscuit dough is about 1 inch thick.IMG_1792_1 IMG_1793_1

I used a very small round cookie cutter, probably about 1 inch across.  You can use whatever size you prefer.  Cut them out as closely together as you can, then reshape the scraps and pat out again to use up all the dough.IMG_1797_1

IMG_1801_1IMG_1803_1

Place them about 2 inches apart on an ungreased baking sheet.

IMG_1798_1

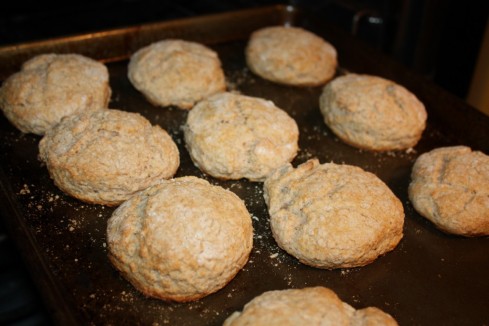
Bake at 350 degrees for 15 minutes or so until barely golden brown.  Remove from oven and allow to cool completely on wire racks.  Once they’ve cooled completely, make the glaze by placing the powdered sugar in a bowl and stir in the 1/2 cup milk and the vanilla.

IMG_1826_1_1

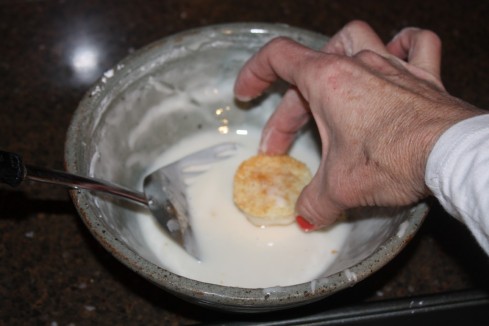
Dip the cooled biscuits one at a time into the glaze, flipping over to coat  all sides, then place them on wire racks to drip and dry.

IMG_1830_1

IMG_1829_1

IMG_1832_1When completely dry, store in an airtight container.  They will store for several days, but you probably won’t have any left to store!
IMG_1836_1

Leah’s Ultimate BLT

11 Jun

This is definitely not your every day, run-of-the-mill BLT!  Leah came up with this recipe some time ago and it immediately became a family favorite.  It’s a simple matter of assembling the ingredients and mixing up the sauce.  It is a treat anytime!

Ingredients:

Bacon,(I like to use Wright’s thick-sliced hickory smoked bacon) cooked until crisp (this can be done on a sheet pan in the oven instead of having to stand over a frying pan and fry it)

romaine lettuce

sliced tomato

fresh mozzarella, sliced (you can buy it pre-sliced) Note:  this is not regular mozzarella, be sure to buy fresh mozzarella

French baguettes

1/4-1/2 cup pesto

1/4-1/2 cup mayonnaise

Directions:

Place bacon in a single layer on a baking sheet and bake in a 400 degree for about 15 minutes or until done.

Drain on paper towels.  Meanwhile, stir together the pesto and the mayonnaise in equal parts to make the sauce, about 1/2 cup sauce should be enough, so that would be 1/4 cup pesto and 1/4 cup mayonnaise.

Assemble the other ingredients. The key to a good sandwich is good ingredients.  It’s worth it to buy the baguettes from a bakery.  We bought ours locally at Kirchoff’s Bakery in Paducah.

Slice the baguette into sandwich sized pieces and cut each piece in half.

Place under the broiler for a few minutes to toast.

To assemble sandwich, spread both sides of toasted baguette with the pesto mayonnaise.

Next add a layer of fresh mozzarella and bacon.

Add sliced tomato and Romaine lettuce.

Place the top half of the baguette on the sandwich and Enjoy!

Overnight Cinnamon Rolls

15 Mar

I’m always printing out recipes I want to try.  I’ve had this one for a very long time, but have never gotten around to making it until last weekend.  I’m glad I did!  This is such a good recipe!  The appealing thing about this recipe is that the rolls are made the night before and refrigerated, allowing them to rise overnight in the refrigerator.  I put these together on Friday night before I went to bed, then got up the next morning, jogged at the park, did a week’s worth of grocery shopping, and got back home around 9:30 am, timing it just right to bake the rolls for a late Saturday morning breakfast.  I wasn’t certain about how long I could allow them to rise in the refrigerator but they did just fine.  The timing was perfect since the kids are not up any earlier than that on weekends anyway, and they woke up to the wonderful smell of homemade cinnamon rolls.  These rolls will be on the menu for this weekend as well!

Ingredients:

Roll Dough-

1 cup milk

1/3 cup butter

1 pkg. active dry yeast (2 1/4 teaspoons if measuring)

1/2 cup white sugar

4 1/2 cups all-purpose flour

1 teaspoon salt

3 eggs

Filling –

soft butter

3/4 cup brown sugar

1 Tablespoon ground cinnamon

1/2 cup raisins (optional, I left the raisins out since my kids aren’t crazy about raisins.  You could also used chopped pecans or walnuts if you like)

Glaze –

1 teaspoon light corn syrup

1/2 teaspoon vanilla

1 1/4 cups powdered sugar

2 Tablespoons half and half or cream

Directions:

Heat the milk in a saucepan for just a little bit to warm it, but not too hot (or it’ll kill the yeast).  You just don’t want it to be cold, more warm to luke-warm.  Add the butter and stir to melt.  ( it doesn’t have to melt all the way, just mostly)

Pour the milk, butter mixture into a large mixing bowl and sprinkle in the yeast.  Add the sugar, 3 cups of the flour, salt, and eggs.  Beat for two minutes until well combined.

Once the dough is mixed well, switch to the dough hook (if you have it) and mix in the additional flour, 1/2 cup at a time, mixing well after each addition.

When the dough has pulled together into a ball, turn it out onto a floured surface.

(At this point, you may need to knead by hand if you weren’t able to use the dough hook in the mixing process) You want to end up with a nice smooth ball of dough.

Lightly oil a bowl, and place the dough in the bowl, turning it to coat the top.  Cover with plastic wrap and place in a warm place to rise until doubled in size.

Once it has risen to almost twice its original size, turn it out onto a floured surface and roll it out into a 10 x 14 inch rectangle.

Rub softened butter on the top (about 2 Tablespoons or so)

Mix the brown sugar and cinnamon together and sprinkle over the surface.

If you are using raisins, or nuts (or both) sprinkle them over the cinnamon sugar layer.  I didn’t use them, because I would have had a mutiny on my hands!

Roll up the dough into a log starting along the long side.

Seal the seam by pressing it together to close. Slice the log into 12 even slices.  They’ll be about an inch thick.  You can do this easily by first cutting the dough log in half right down the middle, then cut each of the halves down the middle. That will give you 4 fairly equal pieces.  Cut each of the four sections into 3 slices each.  I find that this is an easy way to get even slices, but use any method that works for you.

Places the slices cut side down in a lightly greased 9 x 13 inch baking pan.

Cover with plastic wrap and place in refrigerator to rise overnight.

The next morning, preheat the oven to 375 degrees.  Take the rolls out of the refrigerator and allow them to stand at room temperature for about 30 minutes before baking.

Bake the rolls for 20-25 minutes until golden brown.

While the rolls bake, stir together the glaze ingredients.  Add enough cream or half and half to be able to mix the glaze until smooth.

Drizzle the warm rolls with the glaze as soon as they come out of the oven.

Serve right away while still warm!  Delicious!

Italian Bread

17 Jan

I’ve been wanting to get this recipe on my blog for a long time.  It’s one of my most requested recipes.  It is so versatile and gives good results every time.  It is a great way to venture into the yeast bread world because even a beginner can handle this recipe.  I don’t know how many loaves of this bread I’ve made over the years.  One of the nicest things about this dough, is that you can bake it partially, and freeze it for later.  When you are ready to serve, just finish baking.  I always serve this bread with dipping oil.  We tear the bread into hunks and dip it into the seasoned olive oil.  It is delicious!  This bread is a great companion to almost any entree, but especially with Italian food.  On this particular night, I also fixed Chicken Alfredo.   The dipping oil and Chicken Alfredo recipes are coming soon.

I make this bread in my food processor.  If you don’t have a food processor sturdy enough to handle dough, you can make it with a mixer and knead it by hand, but I love the ease of using the food processor and the results it gives.  As a bonus, it is much quicker than the traditional method.  I got home from work at 4:30 pm today and had this bread and Chicken Alfredo ready to eat by 6:00 pm.

If you decide to purchase a food processor  for bread, make sure it is one that is sturdy enough to handle dough.  I have a Cuisinart and use it very often.  It is a little pricier than some, but well worth the extra money.  I’ve owned a Cuisinart food processor for about 25 years (I’m on my second one, but just because as my family grew, I needed a bigger model that would handle more dough!)  I always make my pizza dough in the food processor as well, but enough of the Cuisinart commercial, here’s the recipe:

Ingredients:  (Makes two long loaves)

5 cups all-purpose flour

1 Tablespoon sugar

2 teaspoons salt

2 pkg. active dry yeast (or 4 1/2 teaspoons yeast)

1 Tablespoon butter or margarine

1  3/4 cup warm water

Olive oil to brush the top of the loaves

In the work bowl of a sturdy food processor fitted with the dough blade, place 2 cups flour, 1 Tablespoon of sugar, 2 teaspoons salt, and 2 pkg. yeast.

Add 1 Tablespoon butter or margarine ( no need to melt).

With food processor running on dough speed, slowly add 1 3/4 cups warm water in a slow stream through the top feed tube.

Once all the water has been added, dough will look like this:

With food processor still running, begin to spoon the remaining flour into the top by heaping spoonfuls.

Once all the flour is added and incorporated, the dough should begin to stick together in a big mass and the dough should clean the sides of the work bowl.

You can add a little flour if needed if it seems too sticky.

Turn dough out onto a floured surface and turn it over on itself a few times to gather into a nice ball.

Cut ball in half and coat the cut sides with flour then put the halves back together and cover with a large bowl and allow it to rest for 20 minutes.  (This little step will make the dough much easier to work with and shape)

When the 20 minutes is up, remove the bowl and take one half of the dough and begin to flatten it into a long rectangle.

Begin to roll it up from the long side and seal the seam so that the loaf stays together.

Place each loaf seam side down on a baking sheet that has been coated with olive oil.  You can place both loaves on the same sheet, just make sure they don’t touch and there’s room between for them to rise.

Rub or brush olive oil on the top surface of the loaves.

Cut diagonal slits in the top of dough about 1/4 inch or so deep.

Cove r with plastic wrap and allow dough to rise in the refrigerator for two hours (if you have time).

To speed things along (like I did tonight) just let it sit out at room temperature to rise.  When loaves have risen some ( no need to double in size), remove plastic wrap and place in a preheated 425 degree oven.

Bake for 20 minutes,  or til browned.

If you want to partially bake the loaves and freeze them for later, bake for about 10 minutes or so, or just til dough is set and begins to brown a little.  Remove from the oven, allow to cool completely, then bag up in large ziplock freezer bags and freeze.  When you are ready to serve, sit out at room temperature, then bake for 10 minutes at 425 degrees to serve.

Printer Friendly Recipe with no pictures, just highlight and print selection

Ingredients:

5 cups all-purpose flour

1 Tablespoon sugar

2 teaspoons salt

2 pkg. active dry yeast (or 4 1/2 teaspoons yeast)

1 Tablespoon butter or margarine

1  3/4 cup warm water

Olive oil to brush the top of the loaves

In the work bowl of a sturdy food processor fitted with the dough blade, place 2 cups flour, 1 Tablespoon of sugar, 2 teaspoons salt, and 2 pkg. yeast.  Add 1 Tablespoon butter or margarine ( no need to melt).  With food processor running on dough speed, slowly add 1 3/4 cups warm water in a slow stream through the top feed tube.

With food processor still running, begin to spoon the remaining flour into the top by heaping spoonfuls.  Once all the flour is added and incorporated, the dough should begin to stick together in a big mass and the dough should clean the sides of the work bowl.  You can add a little flour if needed if it seems too sticky.  Turn dough out onto a floured surface and turn it over on itself a few times to gather into a nice ball.  Cut ball in half and coat the cut sides with flour then put the halves back together and cover with a large bowl to allow it to rest for 20 minutes.  (This little step will make the dough much easier to work with and shape)

When the 20 minutes is up, remove the bowl and take one half of the dough and begin to flatten it into a long rectangle.  Begin to roll it up from the long side and seal the seam so that the loaf stays together.  Place each loaf seam side down on a baking sheet that has been coated with olive oil.  You can place both loaves on the same sheet, just make sure they don’t touch and there’s room between for them to rise.

Cut slits in the top of dough about 1/4 inch or so deep then brush loaves with olive oil.

Cove r with plastic wrap and allow dough to rise in the refrigerator for two hours (if you have time).  To speed things along (like I did tonight) just let it sit out at room temperature to rise.  When loaves have risen some ( no need to double in size), remove plastic wrap and place in a preheated 425 degree oven.  Bake for 20 minutes,  or til browned.  If you want to partially bake the loaves and freeze them for later, bake for about 10 minutes or so, or just til dough is set and begins to brown a little.  Remove from the oven, allow to cool completely, then bag up in large ziplock freezer bags and freeze.  When you are ready to serve, sit out at room temperature, then bake for 10 minutes at 425 degrees to serve.

Polenta with Black-eyed Pea Topping

7 Oct

This is a new recipe I just tried and it received a thumbs-up from each family member.  I love black-eyed peas but don’t fix them very often.  We always eat them on New Year’s Day (it’s a long-standing tradition), but I rarely have them at other times of the year.  This is a great way to use them and the polenta was very easy to make. Don’t be intimidated, this is an easy recipe!  The fresh tomato and fresh cilantro are a great combination with the warm peas and polenta.  If you aren’t familiar with polenta (it has gained popularity over the last couple of years), it is very simply cornmeal cooked with water (or broth) until very thick.  I’d never heard the term polenta until a few years ago.  My family always called this cornmeal mixture “mush”.  We used a slightly thinner version of it to make homemade hot tamales.

The original recipe called for purchased polenta, which I’m told can be found in the produce section of the grocery, but not in Benton!  I even tried to find it at Kroger, but they didn’t have it either, so we made our own.  It is very easy, just takes a little muscle since it gets very thick and is hard to stir at the end.  In fact, I had one of my kids prepare the polenta early in the day since I was stripping wallpaper and didn’t want to leave that job.  If you make your own polenta, you’ll need to allow time to refrigerate it for a couple of hours so that it is firm and easy to slice.

Ingredients:

1 tube refrigerated polenta, cut into thick slices (or make your own, recipe follows)

2 cans black-eyed peas, drained and rinsed

1/2 cup chopped sweet onion

1/4 cup water

1/8 teaspoon ground red pepper

1/2 teaspoon salt

3 medium fresh tomatoes, diced

3 Tablespoons fresh cilantro, chopped

sour cream for garnish

Spray a non-stick skillet with cooking spray and lightly brown polenta on each side (about 4 minutes or so on each side).  Remove from heat and keep warm.

In same skillet, add a little olive oil and saute the onion for a minute or two until they start to soften a bit.

Add drained and rinsed peas, water, red pepper, and salt.  Cook just long enough to heat the peas and evaporate the water, but don’t cook too long or peas will get mushy.

Remove from heat and stir in the fresh tomatoes and cilantro.  Spoon the tomato-pea mixture over the browned polenta.  Top with a dollop of sour cream.  Delicious!

Polenta recipe:

6 cups water

2 teaspoons salt

1 3/4 cups yellow cornmeal (NOT cornmeal mix)

3 Tablespoons butter

Bring water to a boil in a large pot.  Add salt and gradually stir in corn meal with a whisk.  Reduce heat to low and cook until the mixture thickens and the cornmeal is tender stirring often.  Will take from 8-15 minutes.  Mixture will get very thick and be difficult to stir at the end.   Remove from heat and stir in butter until melted. Spoon the hot polenta into a greased baking dish, spreading evenly to about 3/4 inch or so.  Cover with plastic wrap and refrigerate at least 2 hours before slicing.  When ready to prepare, cut polenta into squares, just as you would cut brownies.

Printer-friendly version with no pictures,  just highlight and select to print.

1 tube refrigerated polenta, cut into thick slices (or make your own, recipe follows)

2 cans black-eyed peas, drained and rinsed

1/2 cup chopped sweet onion

1/4 cup water

1/8 teaspoon ground red pepper

1/2 teaspoon salt

3 medium fresh tomatoes, diced

3 Tablespoons fresh cilantro, chopped

sour cream for garnish

Spray a non-stick skillet with cooking spray and lightly brown polenta on each side (about 4 minutes or so on each side).  Remove from heat and keep warm.

In same skillet, add a little olive oil and saute the onion for a minute or two until they start to soften a bit.  Add rinsed and drained peas, water, red pepper, and salt.  Cook just long enough to heat the peas and evaporate the water, but don’t cook too long or peas will get mushy.

Remove from heat and stir in the fresh tomatoes and cilantro.  Spoon the tomato-pea mixture over the browned polenta.  Top with a dollop of sour cream.  Delicious!

Polenta recipe:

6 cups water

2 teaspoons salt

1 3/4 cups yellow cornmeal (NOT cornmeal mix)

3 Tablespoons butter

Bring water to a boil in a large pot.  Add salt and gradually stir in corn meal with a whisk.  Reduce heat to low and cook until the mixture thickens and the cornmeal is tender stirring often.  Will take from 8-15 minutes.  Mixture will get very thick and be difficult to stir at the end.   Remove from heat and stir in butter until melted.  Spoon the hot polenta into a greased baking dish, spreading evenly to about 3/4 inch or so.  Cover with plastic wrap and refrigerate at least 2 hours before slicing.  When ready to prepare, cut polenta into squares, just as you would cut brownies.

Fresh Tomato Balsamic Bruschetta

25 Aug

Wow what a great recipe!  I undid my 2 mile jog today in one fell swoop with this one!  I’ve tried many bruschetta recipes, but this is by far my favorite.  You can’t beat the fresh tomato balsamic vinegar combination.  Don’t skip the balsamic or switch it for another type of vinegar.  It is key to this recipe.

With fresh tomatoes in season right now, I wanted to use them while they are available, so I made two fresh tomato recipes for dinner tonight.  I served this fresh tomato bruschetta with spaghetti squash topped with a fresh tomato red sauce.  Both recipes are keepers.
Ingredients:

2 fresh tomatoes, diced (I used one red and one yellow because that’s what I had and thought the different colors would be interesting.  As a bonus, yellow tomatoes are typically a little sweeter than red, so it was a good combination, but use whatever you have)

1/2 cup fresh shredded Parmesan cheese (not the stuff in the green can)

1/4 cup minced fresh basil (always use fresh if you can)

3 Tablespoons olive oil

2 Tablespoons minced fresh parsley

3 cloves garlic, grated

2 teaspoons balsamic vinegar (do not substitute)

1/8 teaspoon salt (or to taste)

1 French baguette or crusty Italian bread

1/4 cup butter, softened

sliced mozzarella cheese

Directions:

Combine first 10 ingredients in a bowl and stir to combine.

Slice the bread into 1/2 inch slices and brush one side with butter.  Place on a baking sheet and top with sliced mozzarella.

Place under the broiler just until cheese has melted.  Remove from oven and top each piece of bread with a spoonful of the tomato mixture.

Serve immediately.

Recipe only (printer friendly)  Highlight and print selection:

Ingredients:

2 fresh tomatoes, diced (I used one red and one yellow because that’s what I had and thought the different colors would be interesting.  As a bonus, yellow tomatoes are typically a little sweeter than red, so it was a good combination, but use whatever you have)

1/2 cup fresh shredded Parmesan cheese (not the stuff in the green can)

1/4 cup minced fresh basil (always use fresh if you can)

3 Tablespoons olive oil

2 Tablespoons minced fresh parsley

3 cloves garlic, grated

2 teaspoons balsamic vinegar (do not substitute)

1/8 teaspoon salt (or to taste)

1 French baguette or crusty Italian bread

1/4 cup butter, softened

sliced mozzarella cheese

Directions:

Combine first 10 ingredients in a bowl and stir to combine.

melted.  Top each slice with a spoonful of the tomato mixture.  Serve immediately.

deSha’s Cornbread

22 Feb

This is no ordinary cornbread!  This recipe came from a restaurant in Lexington, KY called deSha’s.  We have eaten there a few times when visiting there, and the cornbread is a signature item for them.  It is served warm with honey butter and is good enough to eat for dessert!  I prepared this cornbread last week with Porcupine meatballs, scalloped potatoes and broccoli.  I was just pulling the cornbread out of the oven when Matt arrived home from basketball practice with one of his buddies. Needless to say, there was no cornbread left over for the next day.  I heard his friend say, “this is the most amazing cornbread I’ve ever eaten!”  It’s a special treat and makes a big 9 x 13 size pan.

Ingredients for cornbread:

3 cups self-rising cornmeal (cornmeal mix, not plain cornmeal) This will come in white or yellow, it makes no difference, but I used white

1/3 cup sugar

6 eggs

3/4 cup vegetable oil

3 cups sour cream

2 2/3 cups canned cream style yellow corn (this is a little less than two 15 oz. cans)

Ingredients for honey butter:

1 stick real butter, softened at room temperature

1/4 cup honey

Directions for Cornbread:

Place cornmeal mix and sugar in a large bowl.

Add the eggs, oil, and sour cream.

Stir in 2 2/3 cups cream style corn.

Mix well and pour into a greased 9 x 13 pan.

Bake in a 350 degree oven for 30-45 minutes, or until set in the center and lightly browned on top.

Cut into 12 squares and serve warm with honey butter.  (Recipe below)

For honey butter:

Mix softened butter with honey and stir until well combined.